Create Stunning AI Birthday Photos on Your Phone – Step-by-Step Guide
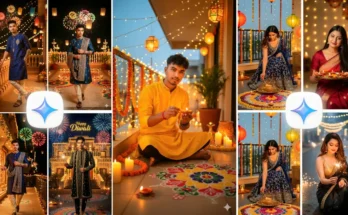
Hey guys! 👋 So, the photo you’re seeing on the screen right now is a beautiful AI-generated birthday photo. The best part? You can easily create this type of image right from your phone — literally in one click! Whether you want to make it for yourself or surprise your friends, this guide will show you how to do it perfectly.
🎉 What You’ll Learn
In this tutorial, I’ll show you how to turn a simple, normal photo into an amazing AI birthday-style image for both males and females. If you’ve ever wanted to wish your friend a happy birthday in a creative way, this is for you. Imagine sending them a personalized AI-generated photo — they’ll love it!
📲 Step 1: Install the Required App
First, open your Google Play Store and search for the app named Google AI (or whichever AI photo generator the creator mentioned in the video). Once you find it, install it on your phone.
After installation, open the app and log in using your Gmail ID. You’ll see a plus (+) icon on the screen — tap it to upload your photo. This can be a regular selfie or any simple photo you want to enhance.
💡 Step 2: Add the Perfect Prompt
After uploading your image, the next step is to enter your prompt. Since we’re creating a birthday-style photo, you’ll need a Birthday Prompt.
You can find amazing ready-made prompts on the creator’s Telegram channel. Just click the link in the video description and join the channel. Once you’re there, search for “Happy Birthday.” You’ll see many prompts and sample photos to choose from.
🎂 Step 3: Copy and Paste the Prompt
When you find a prompt you like, simply press and hold on it, then tap the Copy option. Go back to the AI app, and paste the prompt inside the input box.
Now, tap on the three-line icon (☰) or settings menu and select “Image Generate”. Once done, hit the arrow or generate button — and boom! Your AI birthday photo will start generating instantly. 🚀
📅 Step 4: Personalize Your Image
Here’s the fun part — customization! If the prompt contains an age (like “15 years”), replace it with your actual age. For example, if you’re turning 23, change it to 23 years.
You can also replace “Happy Birthday” with a custom message like “Happy Birthday, Rahul!” or “Happy Birthday, Queen!” — totally up to you. This small change makes the photo look more personal and realistic.
👫 Step 5: Create Male or Female Versions
Want to make a version for your friend, girlfriend, or boyfriend? Simple! If your current prompt mentions boy, change it to girl (or vice versa). You can also upload a different photo to match the gender you’re designing for.
Once done, generate the image again — and there you have it! A beautiful, realistic birthday-style AI photo that you can download and share.
🎁 Bonus Tip: Share and Impress
When you send this kind of AI photo to your friends on their birthday, it feels special and creative. Not only will they appreciate the gesture, but it also looks super professional. You can even post it on Instagram or Facebook to make your birthday wishes stand out.
📸 Example Prompts You Can Try
- “Happy Birthday [Name] sitting with balloons, cake, and golden lights, cinematic style.”
- “AI-generated portrait of a girl celebrating her 21st birthday with candles and confetti.”
- “Birthday couple photo with pastel background, holding gifts, DSLR effect.”
For more creative prompt ideas, you can also check out PromptHero or Lexica.
📥 Step 6: Download and Share
After your image is generated, tap on the Download button to save it on your device. Then share it directly on WhatsApp, Instagram, or Telegram.
If your image doesn’t look perfect on the first try, don’t worry — just tweak your prompt slightly or upload a clearer photo for better results. You can even try PhotoRoom or Canva to add final touches and text overlays.
✅ Final Thoughts
That’s it, guys! You just learned how to create realistic AI birthday photos directly on your smartphone. It’s easy, fun, and makes your wishes stand out from the crowd.
So go ahead — create your photo today, surprise your friends, and make their birthday extra special. If you found this tutorial helpful, don’t forget to like, share, and subscribe for more creative AI photo ideas.